
My Rules and Notes: Whenever I’m confused about which zone to trade from, when there are multiple zones, I will simply use the extreme (last) zone.
- Both Reversal and Continuation trade entry setups are valid. The key is knowing when to avoid a reversal trade and choose a continuation trade instead. This is especially important when the (Reversal trend) is weak. In such cases, wait for the trend to shift into a confirmed (Continuation trend), then take an entry at the zone after the pullback.
- Reversal trades are high-risk, high-reward setups. To increase the probability of a successful reversal trade, I should look for strong imbalance, bigger liquidity grab moves with candle body closes, and retail liquidity traps. A minimum of three strong conditions should back my trade setup before entry.
- The market is fractal in nature, so every Higher Time Frame (HTF) strategy can also work on Lower Time Frames (LTF). It’s important to learn how to shift to LTF and redefine zones for better risk-reward and more accurate entries. Always try to use the Extreme Zone (means last zone) when there are two or more zones nearby.
Trade Types
There are only two types of trades: Reversal trades and Continuation trades.
- A Reversal trade aims to catch a change in trend, buying at the end of a downtrend or selling at the end of an uptrend.
- A Continuation trade follows the existing trend, looking to trade in the same direction as the market’s current momentum.
Reversal Trades Examples
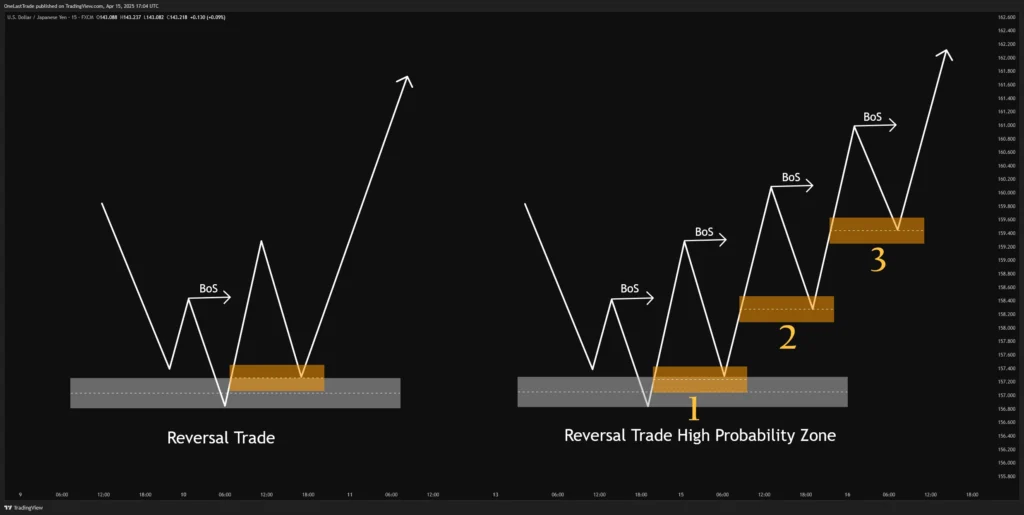
Learning from the above image:
- In a reversal trade, wait for a shift in market structure after a pullback to a key level, then enter when the price shows clear signs of reversing the previous trend.
- Entries from Zones 1, 2, and 3 are good & valid, but for a high-probability zone setup, use Zone 2. It provides additional continuity of the break of structure (BoS), which is a strong sign of trend continuation.
- So, Zone 2 is a more confirmed entry and we can trade it with confidence.
Quick Summary: Reversal trades are logical setups based on signs of trend exhaustion or structural shifts. They allow us to enter early in a new trend, offering the potential for larger moves because of this, we can often hold the trades longer and capitalize on big profits.
Continuation Trades Examples
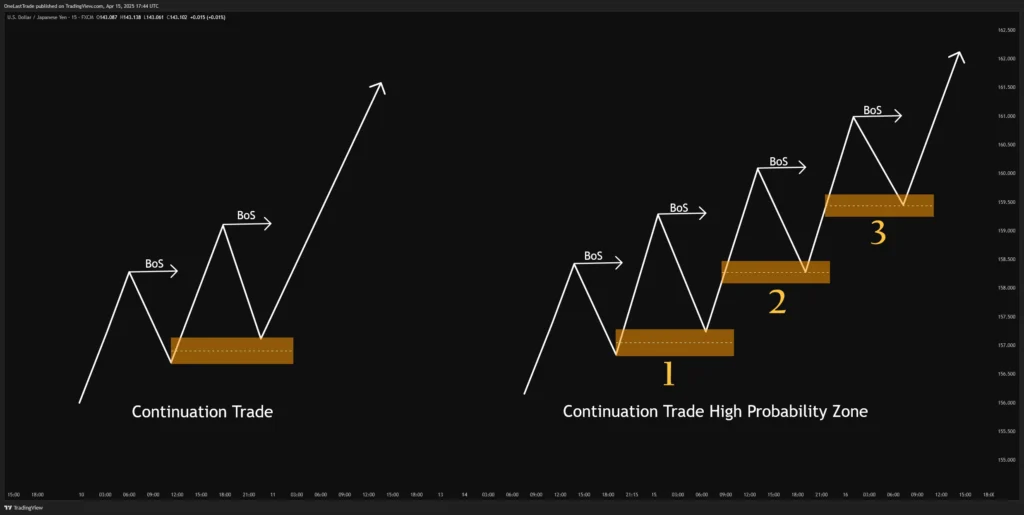
Learning from the above image:
- Continuation trades are easy to follow as they involve entering after a pullback at a key zone and riding the trend in its current direction.
- Entries from Zones 1, 2, and 3 are good & valid if the market structure is clean and intact.
- For a high-probability zone, look for an imbalance, a clean break of structure (BoS), and a candle body close. Let the pullback occur to the zone, and then take the entry from there.
Quick Summary: Continuation trades are simpler and less exciting because we join the trend midway, rather than catching it from the beginning. They typically offer smaller profits but are easier to execute. As long as the trend remains intact, we can continue to profit from them.
Point 1: Both Reversal and Continuation trade entry setups are valid. The key is knowing when to avoid a reversal trade and choose a continuation trade instead. This is especially important when the (Reversal trend) is weak. In such cases, wait for the trend to shift into a confirmed (Continuation trend), then take an entry at the zone after the pullback. ✔
Examples Trade Psychology and Notes
It is very important to understand that trading is a big game probability. Not all trades will work out, and many will fail, so accept the reality.
Even a good trade can turn against me, and my mind may freeze or become confused. But I should remember that this is the nature of the market, so I shouldn’t panic and must stay focused.
So, let’s see what should I do then and learn from below examples?
Reversal Trade Psychology
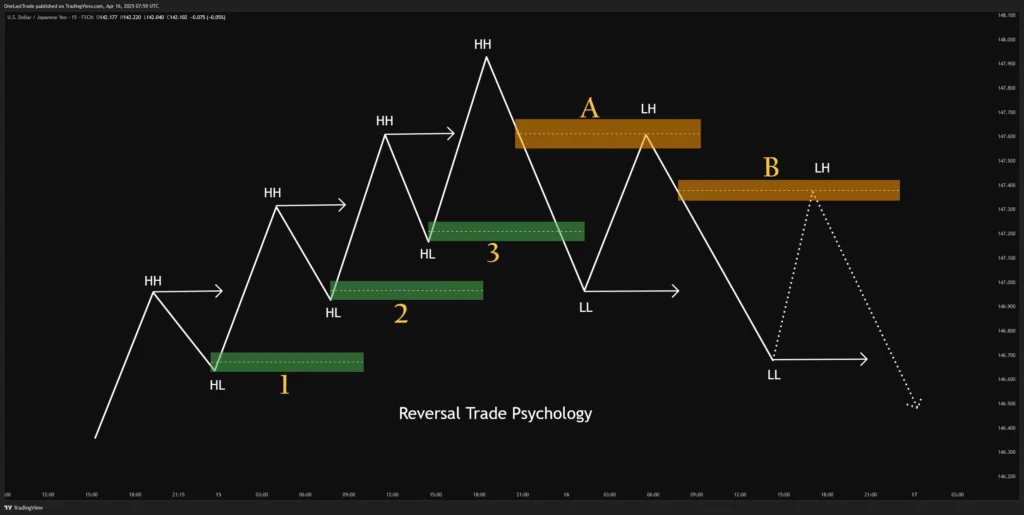
Observations from the above image:
- Taking Long from Demand Zone 1, 2, 3 is valid. Taking Shorts from Supply Zone A and B is also valid.
- To take a riskier and big reward trade, I could use Supply Zone A, if the conditions like Imbalance and Liquidity sweep are met else not.
- To be on a safer side, I should take a confirmed Continuation Short Entry using Supply Zone B instead of Zone A.
- Meaning: Instead of taking direct Reversal trade at Zone A, I should let the trend change into Continuation Trend and take the Short position at Zone B.
Failed Reversal Trade Psychology
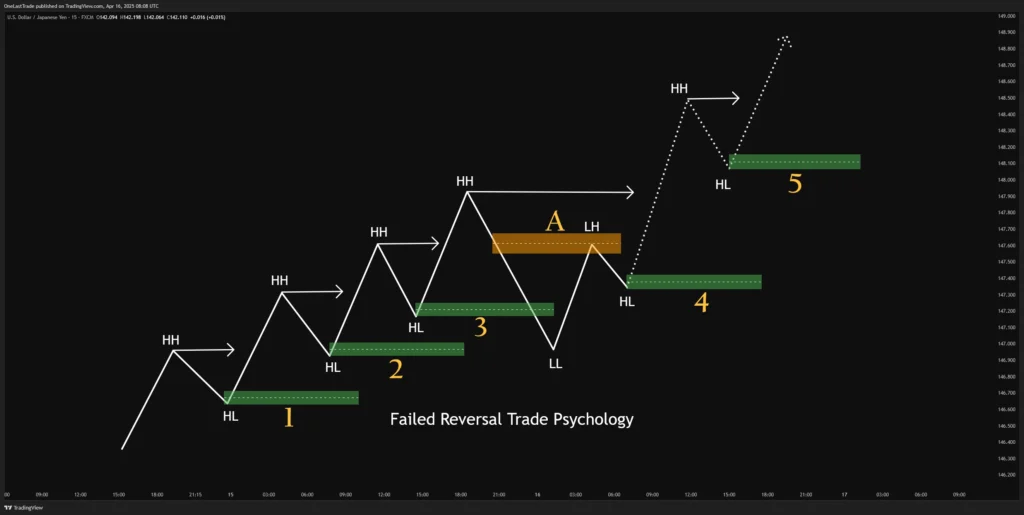
Observations from the above image:
- Taking Long from Demand Zone 1, 2, 3, 4, 5 is valid. Taking Shorts from Supply Zone A is also valid.
- Here, taking a (Reversal Trade) Short position from Supply Zone A after the pullback is totally valid because it Break the Structure (BoS) & created (LL). But the trade didn’t succeed, that’s completely fine.
- Meaning: I should be able to pinpoint the cause instead of just mind freezing or confusing. Here, market created a Break of Structure (BoS) & created (LL) to change the trend from Continuation to Reversal but failed.
- If the reversal trade doesn’t work out, no problem. I can check if a higher high (HH) is broken again with a Break of Structure (BoS), then take a Continuation long trade from Zone 4 after a pullback, or from Zone 5 and stay with the trend.
Very Important Note: Every time a zone breaks, an opposite-side automatically forms. Learn more here: Change of Character Simplified.
To avoid and improve these setups, I should look for:
- Does it have a stronger imbalance reaction for a reversal to confirm a short position?
- Is the market just grabbing more liquidity (orders) before continuing?
- Is the liquidity grab move small or big? And did the candle close there with the body or just the wick?
- Extra Condition: Did the market create (equal lows or highs) and sweeping the retail liquidity (orders)?
Quick Reasoning table to change the trend from Continuation to Reversal:
| Reasoning | High Reversal Clue | Weak Reversal Clue |
| Reversal Imbalance | Strong Imbalance | Weak Imbalance |
| Liquidity grab move | Bigger move breaking the Zone | Smaller move breaking the Zone |
| Liquidity grab candle | Candle body close | Candle wick pass |
| Retail Liquidity grab | Clear sweep | Partial sweep |
So, to enter any trade, I need at least three strong reasons that support the setup and accept the reality that not all trades will work out. Only my risk-to-reward ratio will make me profitable in the end.
Point 2: Reversal trades are high-risk, high-reward setups. To increase the probability of a successful reversal trade, I should look for strong imbalance, bigger liquidity grab moves with candle body closes, and retail liquidity traps. A minimum of three strong conditions should back my trade setup before entry. ✔
Fractal Market
What is the Fractal Market?
The Fractal Market refers to the concept that financial markets are fractal in nature. This means that similar price formations and patterns occur across all time frames. Whether I am looking at the daily, hourly, 5-minute, or even the 1-minute chart, the same types of structures tend to repeat.
As a result, traders can use the same systematic approach across different time frames, regardless of the time frame they choose to trade on.
Example of Fractal Based Trade on EURUSD on Date 27th July 2021.
Taking an example for the EURUSD, considering my HTF is 10Min and LTF is 3Min. This Chart image was taken from the FastBull website.
EURUSD on 10Minute Chart.
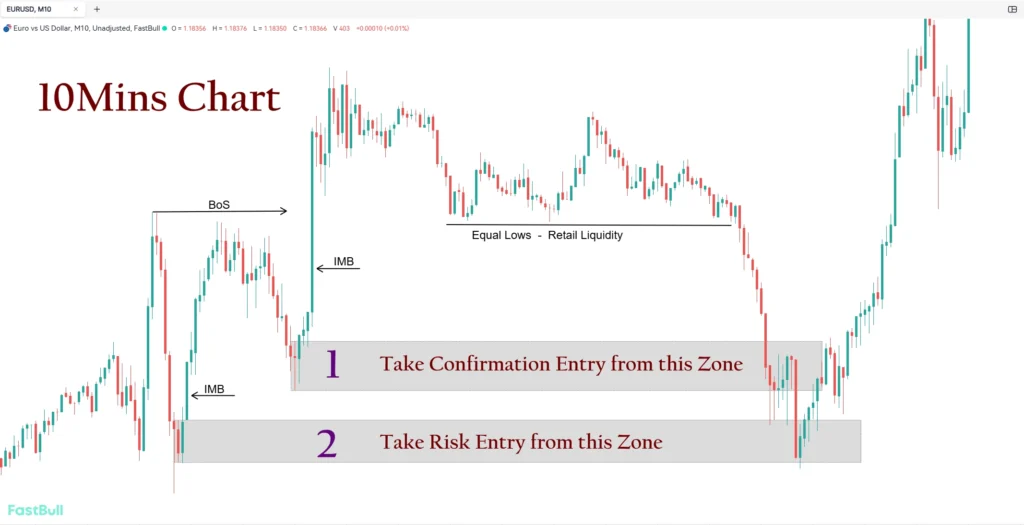
Observations I need to learn:
- EURUSD is in an uptrend. I need to mark the imbalances, Break of Structure (BoS), and Retail Liquidity (equal lows), and then create Zones for entry.
- I have identified two nearby Demand Zones 1 and 2 to consider for a long position.
- Zone 1 is where I can look for a Confirmation Entry, especially if I don’t want to miss the trade.
- Zone 2 is suitable for a Risk Entry because it also contains an Imbalance.
- The key point is that the market may take out early participants who enter from Zone 1.
EURUSD on 3Minute Chart.
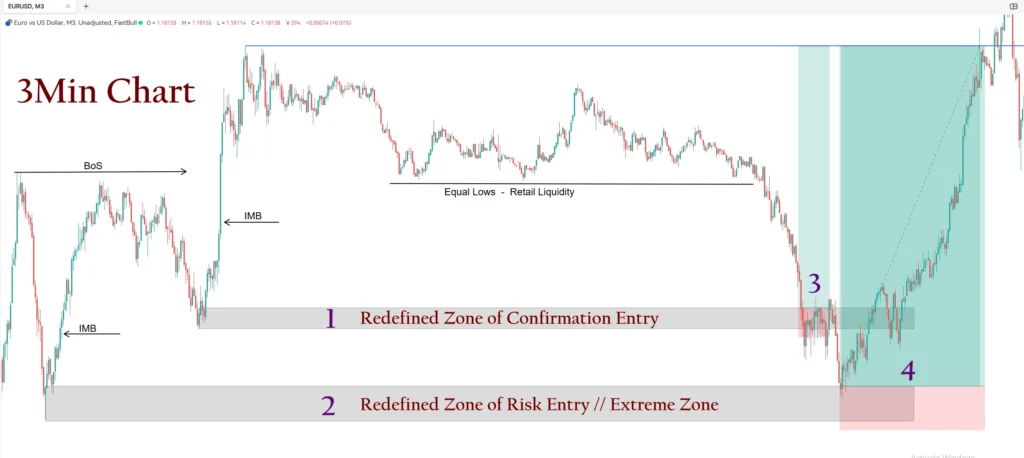
Observations I need to learn:
- To redefine my Demand Zones 1 and 2, I need to shift to a Lower Time Frame (LTF) for smaller stop-loss value and accurate entry.
- Next, I have to mark both Demand Zones (1 and 2) and place the Long Position Tool on the chart.
- The key lesson here is, when there are two nearby zones, it’s often better to focus on the Extreme Zone (Second Zone), as the market may take out early participants and their liquidity.
- I should be prepared for both Confirmation Entry and Risk Entry. Also, I just need to practice this live.
Point 3: The market is fractal in nature, so every Higher Time Frame (HTF) strategy can also work on Lower Time Frames (LTF). It’s important to learn how to shift to LTF and redefine zones for better risk-reward and more accurate entries. Always try to use the Extreme Zone (means last zone) when there are two or more zones nearby. ✔
Closing Comment: What I Have Learned So Far…
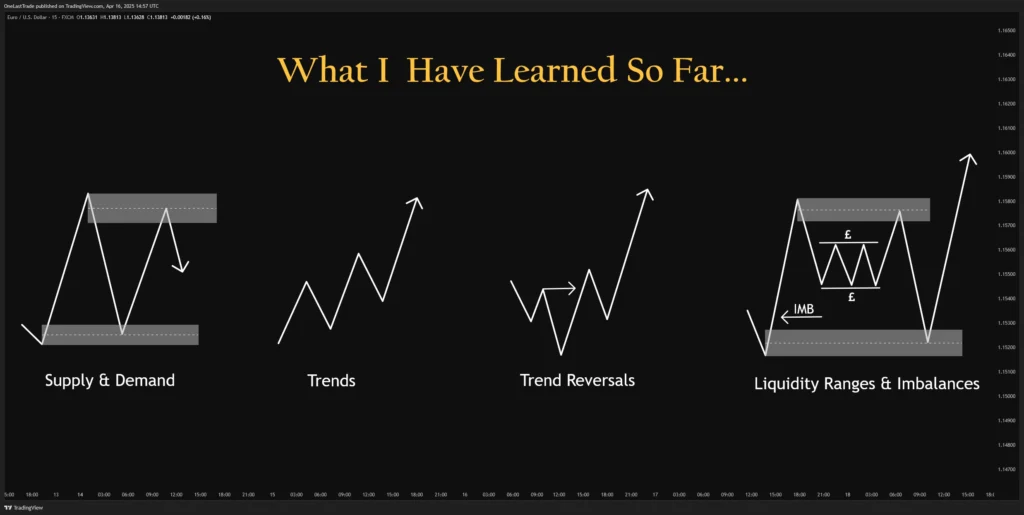
At this current juncture, I have learned the following:
- Supply and Demand
- Continuation and Reversal Trends
- Liquidity Ranges and Imbalances.
- Market Efficiency
- Momentum and Redefined Entries
Ok, then coming to the entry part there are three types:
- FVG – Fair Value Gap – (I don’t know about this.)
- Supply and Demand Zones
- Liquidity area
Rule for Entries with respect to time frame.

To take entries from a zone with respect to time frame, use the below rules:
- For 15Minutes and less, take entry from top of the zone.
- For 30 Minutes and above, take entry from center of the zone.
The above rules are tested by JeaFx and are logical too. Taken from his video lessons.
Important Note: So, I have understood one thing that all our entries in this JeaFx Course are based solely on Zones (Supply Zones and Demand Zones). The trading style is more like a Day Trader, but no worries, I will adapt it for swing trading.
Now all the basic notes from JeaFx are complete. Next, I will start working on HTF/LTF concepts, as the real work on the charts begins now.