
My Rules and Notes: When I’m unsure which zone the market will respect, I just say: I don’t know and let the market play out. I should wait for confirmation, follow the extreme zone, and stay patient. Patience is the name of the game.
- I think that when we use Supply and Demand concept, I should mark zones using the range method because it make sense. But there is no hard and fast rules, use any method which I am comfortable.
- Entries from a S2D or D2S Flip Zone are only valid if it swept liquidity.
- To identify an Order Blocks is look for sharp and substantial upward movement or downward movement.
- There are two ways to enter a trade using this Order Blocks strategy, Risk entry method and Confirmation entry method.
Flip Zones
Flip Zones is nothing different, a Flip Zone can be a Supply Zone or a Demand Zone. So, don’t confuse, it is just a Supply/Demand concept to identify the high probability zone.
There are two types of flip zones: Supply 2 Demand Flip Zone and Demand 2 Supply Flip Zone.
Supply and Demand Flip Zones
- Points of interest where a Supply zone transitions into a Demand zone or vice versa.
- Shift in Order Flow of the market (from bearish to bullish) or vice versa.
- Caused by changes in market sentiment and the psychology of market participants.
Important Note: I think that when we use Supply and Demand concept, I should mark zones using the range method because it make sense. But there is no hard and fast rules, use any method which I am comfortable.
Supply 2 Demand Flip Zone
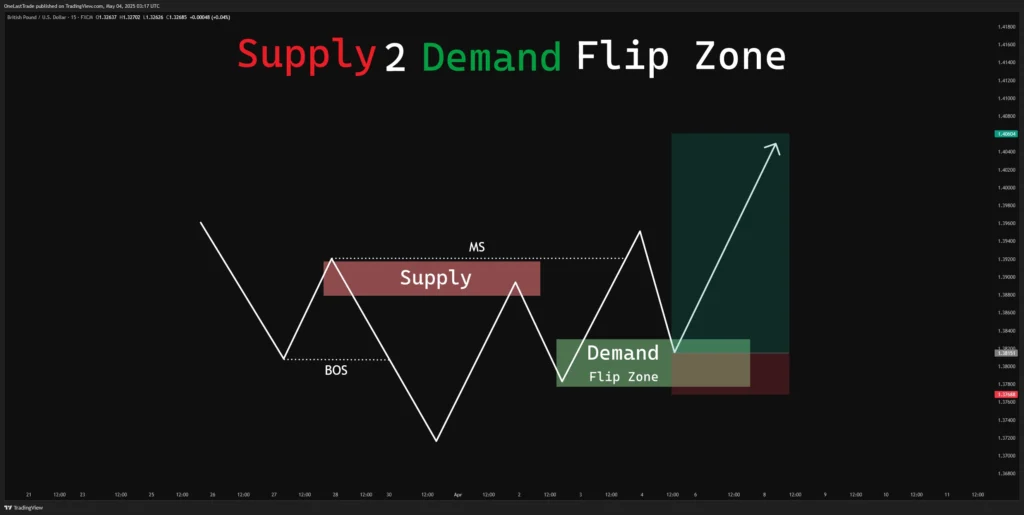
Learning from the above image:
- We want to see a failed reaction from the Supply Zone (price failed to create lower-low) instead price then break the last lower-high and created a market shift (trend changed from bearish to bullish).
- We know that the Supply Zone works but it wasn’t strong enough to continue the overall trend, and that’s when Demand overpowered Supply.
- We call this as Supply 2 Demand Flip Zone.
Demand 2 Supply Flip Zone
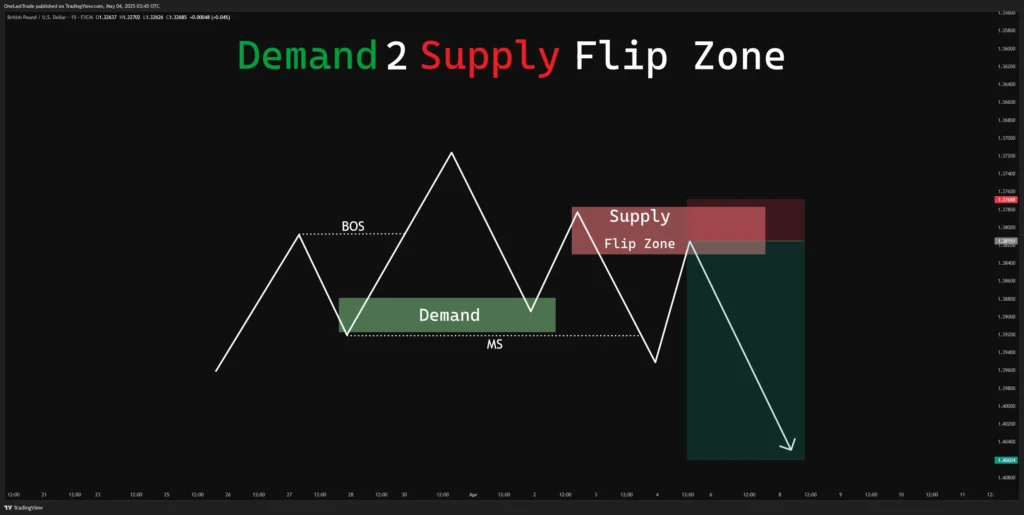
Learning from the above image:
- We want to see a failed reaction from the Demand Zone (price failed to create higher-high) instead price then break the last higher-low and created a market shift (trend changed from bullish to bearish).
- We know that the Demand Zone works but it wasn’t strong enough to continue the overall trend, and that’s when Supply overpowered Demand.
- We call this as Demand 2 Supply Flip Zone.
Important Reasoning for Flip Zone. Be honest and think that no strategy works 100% of the time.
As an probability enhancer ask ourselves: Has the Flip Zone swept liquidity?
- Yes -> Enter on the Flip Zone.
- No -> Enter on the extreme S&D zone or the next Supply or Demand zone, after getting extra confirmation.
Important Note: Entries from a S2D or D2S Flip Zone are only valid if it swept liquidity.
Order Blocks
Question: What are Order Blocks?
Answer: Order Blocks are basically area on price charts where large participants like banks, financial institutions place a substantial amount of buy or sell orders.
Order Blocks and S&D Zones are almost the same, with slight differences:
- Order Blocks are much more effective than S&D Zones.
- Different rules are used when identifying valid Order Blocks.
Important Note: To identify an Order Blocks is look for sharp and substantial upward movement or downward movement.
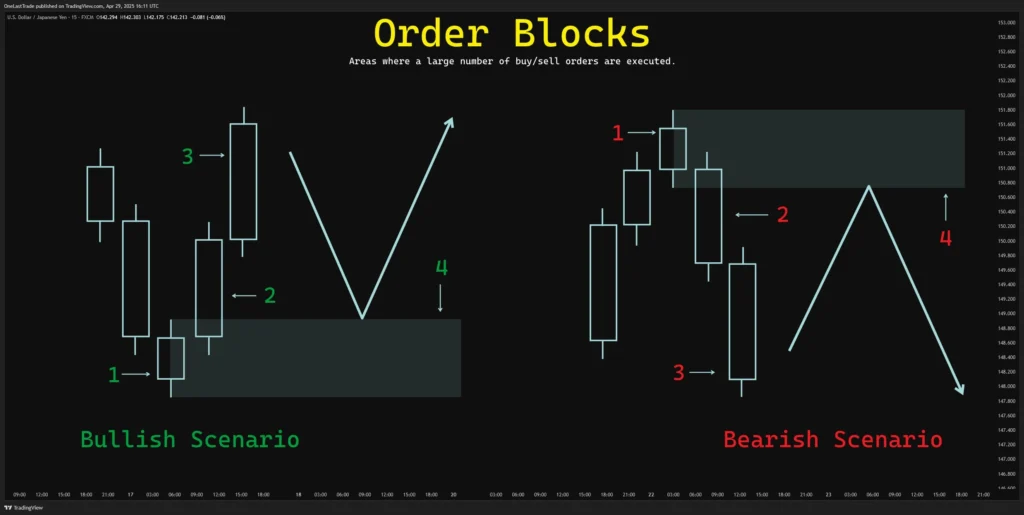
Learnings from above image:
In Bullish Scenario:
- Pivot candle must take out previous candle’s low.
- Gap or Imbalance must be created.
- Sharp & substantial upward movement.
- Order Block is formed at the last bearish candle before sharp upward movement.
In Bearish Scenario:
- Pivot candle must take out previous candle’s high.
- Gap or Imbalance must be created.
- Sharp & substantial downward movement.
- Order Block is formed at the last bullish candle before sharp downward movement.
Four Strict Rules for a Valid Order Block
There are four strict rules for a valid order block. POI must meet all these criteria to be considered as a valid OB. If it does not meet a single one, it’s not an OB.
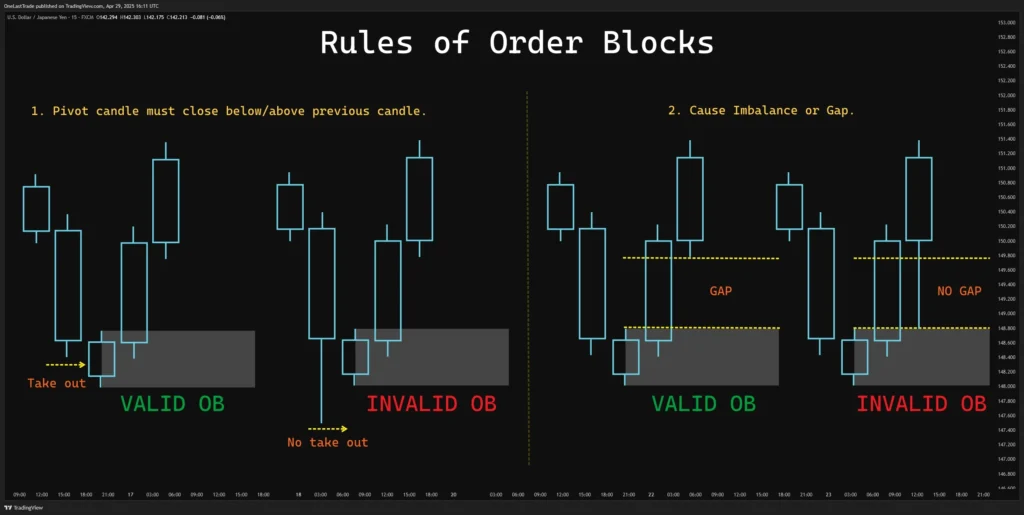
Learning from the above image:
- For an OB to be valid, pivot candle must close below/above previous candle.
- For an OB to be valid, it must cause Imbalance or Gap.
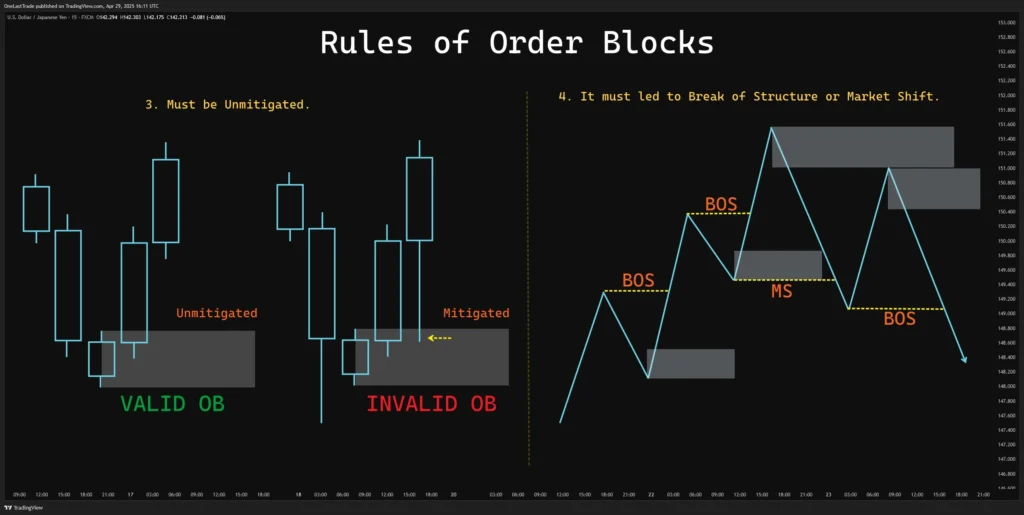
Learning from the above image:
- For an OB to be valid, the Order Block must be Unmitigated.
- For an OB to be valid, it must led to a Break of Structure or Market Shift.
Important Note: There are two ways to enter a trade using this Order Blocks strategy, Risk entry method and Confirmation entry method.
Closing Comment.
This Order Block subject matches with JeaFx, Good. Between Flip Zone and Order Blocks I like the Order Block because it simple and come with a tightest stop-loss.
Keep Practicing…No Strategy is 100%.