My Rules and Notes: Always trade from valid zones like institutions do, and stop relying on retail concepts like support and resistance. Be strict with this rule.
- To identify a supply or demand zone, look for a swing forming a Lower Low (LL) or Higher High (HH) with a Break of Structure (BoS) in the direction of the trend. Then, wait for price to pull back into the zone for a potential sell or buy setup.
- Don’t rely on retail concepts like support and resistance. Trade smart like institutions and focus on Supply and Demand Zones for real buying and selling decisions.
- In both Supply and Demand zones, the reaction should be fast and strong. A fresh, unmitigated zone is ideal for high-probability trades.
- Focus on the zone that broke the structure. That is where the real strength lies, as it directly caused the Break of Structure (BoS). Hence the zone is very important.
- In an uptrend, focus only on buying from demand zones after a pullback. In a downtrend, focus only on selling from supply zones after a pullback. Remember, a ChoCH or BoS must occur to confirm a trend shift.
Supply and Demand Zones
Supply and demand zones are crucial in trading. They help us identify entry points and set profit targets. So when we talk about Supply and Demand Zones:
- A Supply Zone is an area on the chart where selling pressure is strong.
- A Demand Zone is where buying pressure is strong.
So, what exactly are supply and demand zones in trading?
Supply and demand refer to areas in the market where buy and sell orders accumulate. When price reaches a supply or demand zone, we often see a quick reaction in the expected direction.
Supply zones are bearish, and demand zones are bullish. Based on these zones, we can sell or buy accordingly.
Supply Zone.
In a bearish trend, we look for a supply zone that caused the Break of Structure (BoS) after a Lower Low (LL), as it offers a key selling opportunity aligned with the trend.
We then focus on selling from this supply zone and the steps are:
- Wait for a Lower Low (LL).
- Wait for a pullback into a supply zone.
- Look for a sell trade at the supply zone.
- Target a move lower in the direction of the trend.
Demand Zone.
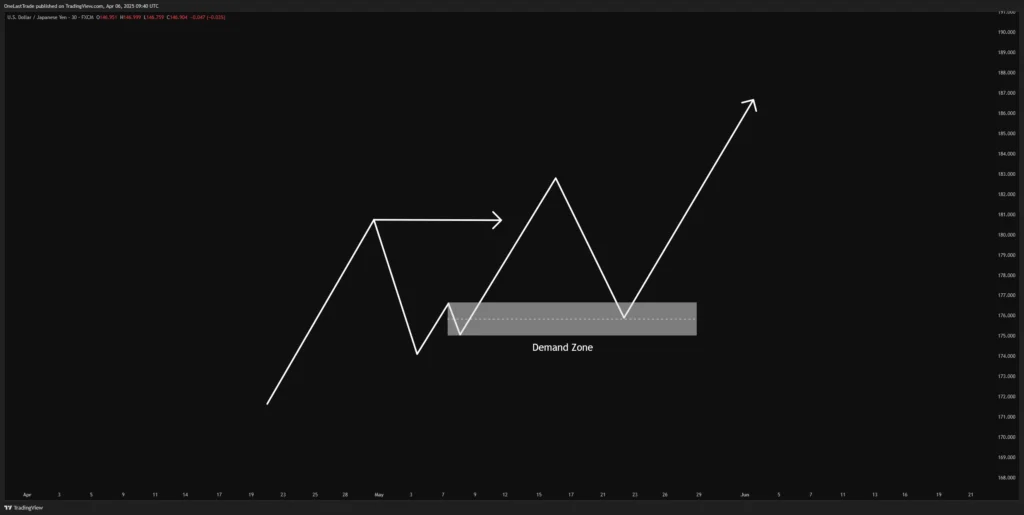
In a bullish trend, we look for a demand zone that caused the Break of Structure (BoS) after a Higher High (HH), as it offers a key buying opportunity aligned with the trend.
We then focus on buying from this demand zone and the steps are:
- Wait for a Higher High (HH).
- Wait for a pullback into a demand zone.
- Look for a buy trade at the demand zone.
- Target a move higher in the direction of the trend.
Point 1: To identify a supply or demand zone, look for a swing forming a Lower Low (LL) or Higher High (HH) with a Break of Structure (BoS) in the direction of the trend. Then, wait for price to pull back into the zone for a potential sell or buy setup. ✔
Trade Smart: Forget Support and Resistance, Focus on Zones.
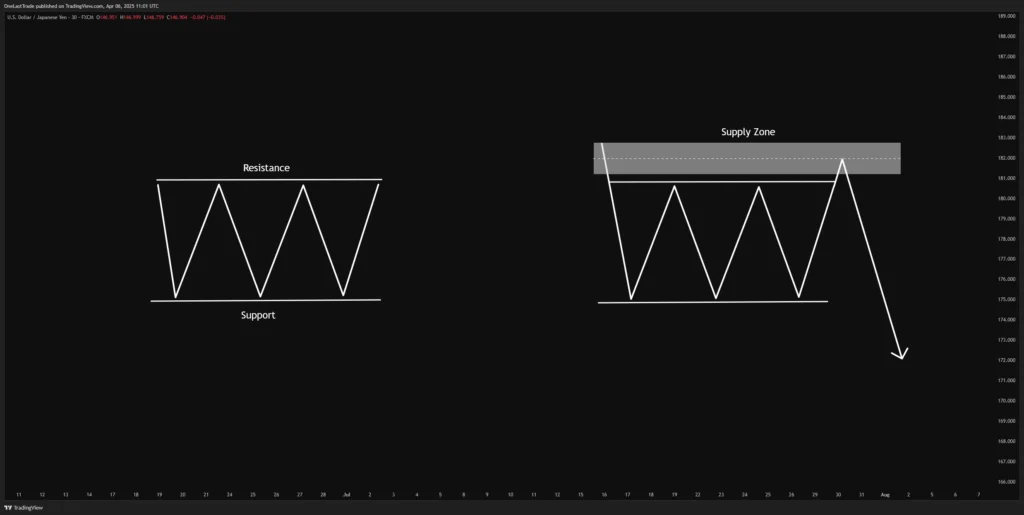
Traditional support and resistance lines often mislead retail traders. They rely on static levels where price might react, but markets aren’t driven by lines. They’re driven by supply and demand imbalances.
Smart traders focus on zones, not lines. Zones reflect where real momentum started, where institutions entered and price made a significant move, often breaking structure.
Here’s how to trade smarter:
- Identify the trend (Higher Highs or Lower Lows)
- Look for a Break of Structure (BoS)
- Mark the demand or supply zone that caused it
- Wait for a pullback into that zone
- Enter with confirmation
Note: Support and resistance is retail thinking. Zones give you real edge.
Point 2: Don’t rely on retail concepts like support and resistance. Trade smart like institutions and focus on Supply and Demand Zones for real buying and selling decisions. ✔
High-Quality Supply and Demand Zone Identification
Supply Zone (Sellers in Control)
- Sharp drop after touch
- Clean, tight base before drop
- Big bearish candles
- Zone should be fresh
- Fast and strong reaction
Demand Zone (Buyers in Control):
- Sharp rally after touch
- Tight base before rally
- Big bullish candles
- Zone should be fresh
- Quick and powerful bounce
Point 3: In both Supply and Demand zones, the reaction should be fast and strong. A fresh, unmitigated zone is ideal for high-probability trades. ✔
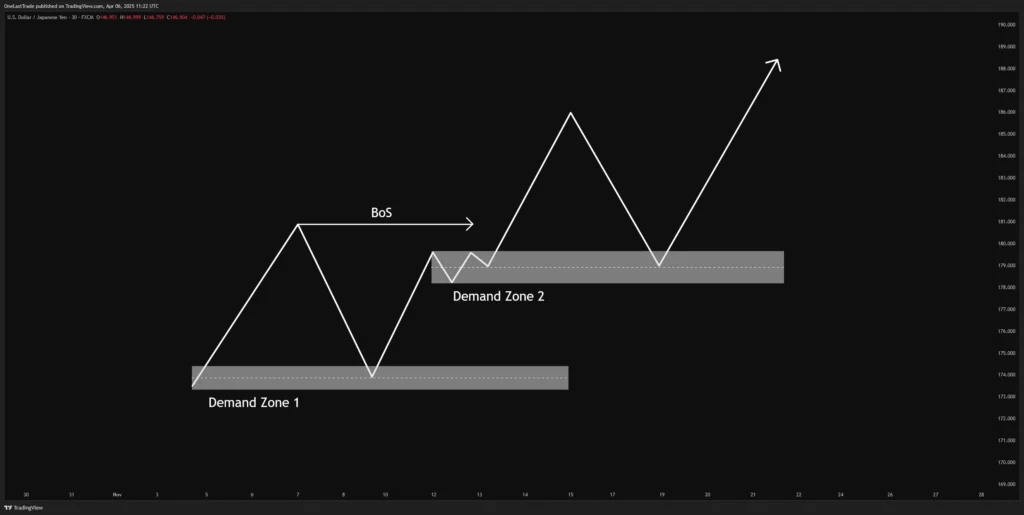
Zones Formed Midway in an Impulsive Move. (Important Topic)
- Supply or demand zones that form in the middle of a strong price move (impulse), not at the origin or at the end.
- These are usually continuation zones, where price pauses briefly before continuing in the same direction.
Supply Zones Formed Midway in an Impulsive Move.
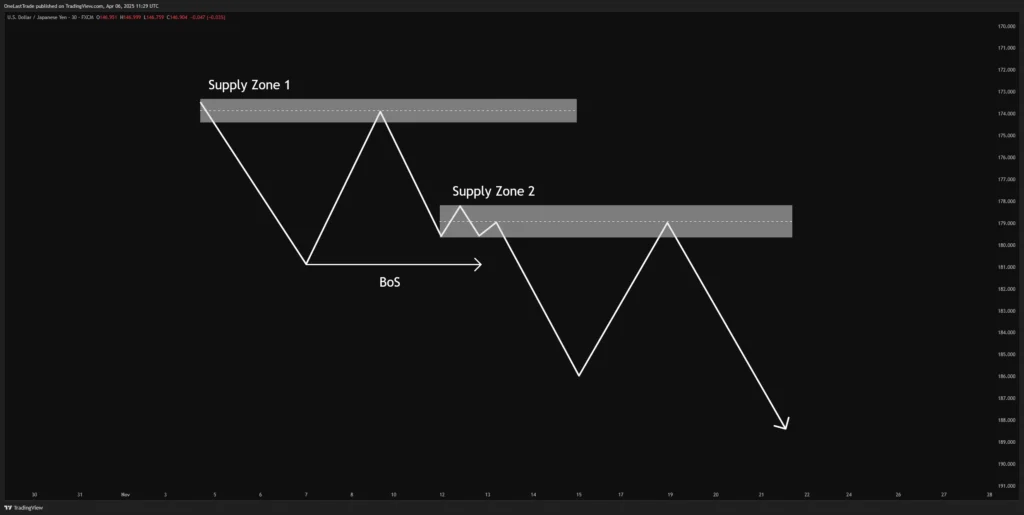
Learning from the above image:
- Supply Zone 1: This is the initial supply where sellers entered, causing a drop. Price pulled back into the zone and dropped again but failed to break structure, indicating that the selling pressure was insufficient.
- Supply Zone 2: This zone formed within the impulsive move, above the structure. Additional sell orders were reaccumulated here, and price dropped further, creating a Break of Structure (BoS). This is the zone that provided the real momentum to break the structure.
👉 Supply Zone: If price drops, consolidates, and drops again, then I should focus on Supply Zone 2 as it holds the real strength.
Demand Zones Formed Midway in an Impulsive Move.
Learning from the above image:
- Demand Zone 1: This is the initial demand where buyers entered, causing a rally. Price pulled back into the zone and moved up again but failed to break structure, indicating that the strength was insufficient.
- Demand Zone 2: This zone formed within the impulsive move, below the structure. Additional buy orders were reaccumulated here, and price rallied upward, creating a Break of Structure (BoS). This is the zone that provided the real momentum to break the structure.
👉 Demand Zone: If price pushes up, consolidates, and pushes again, then I should focus on Demand Zone 2 as it holds the real strength.
Very Important Key Point of the Zones.
- Focus on the zone that broke the structure. That is where the real strength comes from.
- Because this is the zone that created direct Break of Structure (BoS).
Point 4: Focus on the zone that broke the structure. That is where the real strength lies, as it directly caused the Break of Structure (BoS). Hence the zone is very important. ✔
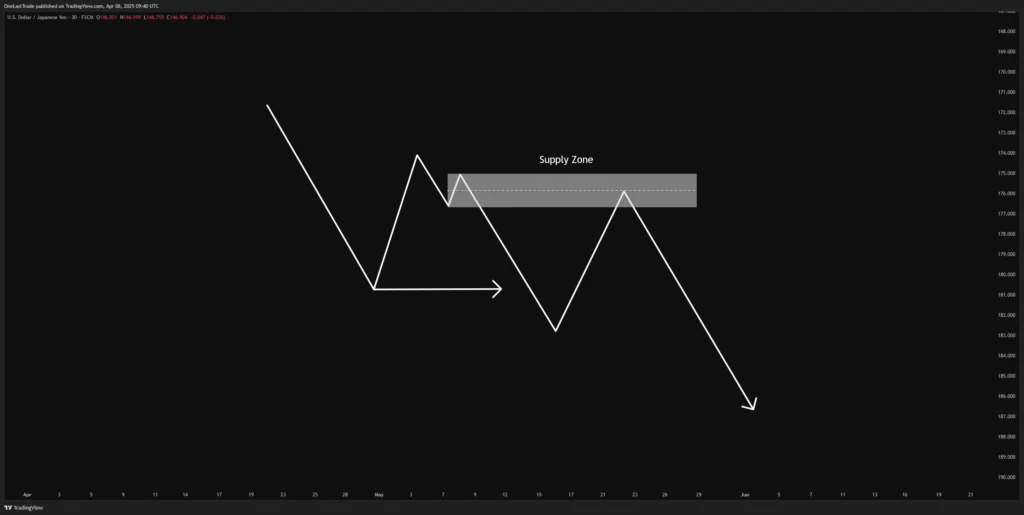
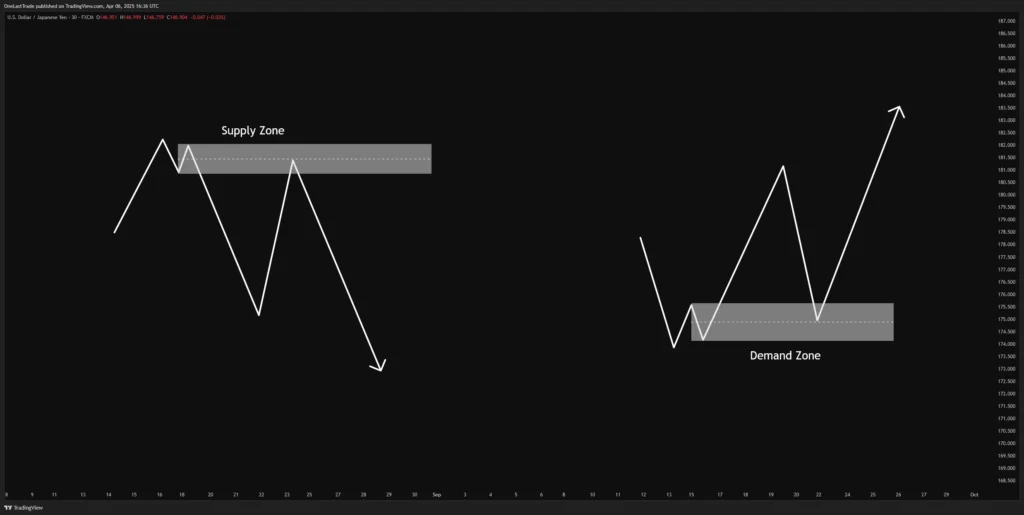
Identifying Tradeable vs Non-Tradeable Zones.
⭐ Very Important Rule: Only buy from demand zones in an uptrend, and only sell from supply zones in a downtrend.
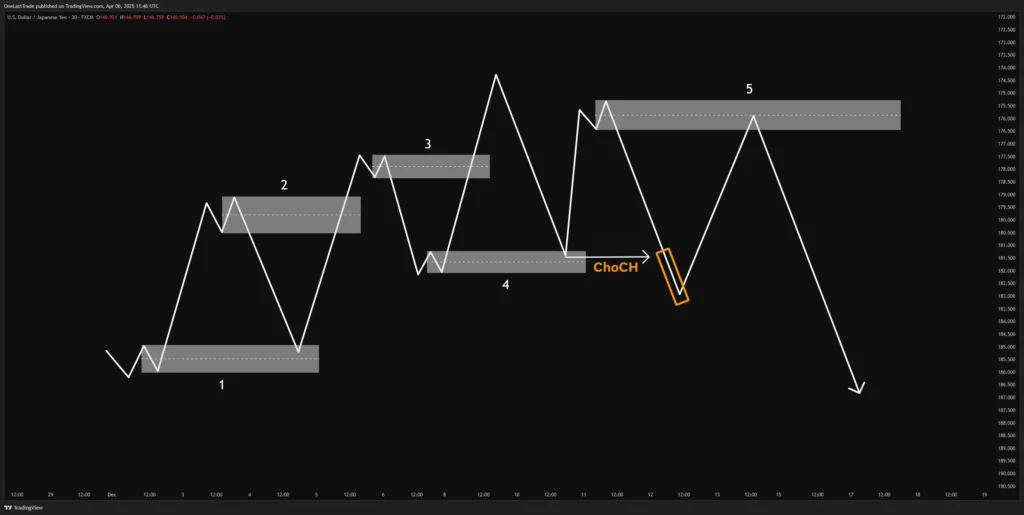
Learning from the above image:
- ✅ Buy in this Demand Zone after the pullback. The market is in an uptrend.
- ❌ Do not sell in this Supply Zone. The market is still in an uptrend.
- ❌ Avoid selling in this Supply Zone. The trend remains bullish.
- ✅ Buy in this Demand Zone after the pullback. The uptrend is still intact.
- ⚠️ If the market fails to make a higher high, wait. A trend shift is only confirmed after a bearish Change of Character (ChoCH). Then, wait for a pullback and look for sell opportunities.
Point 5: In an uptrend, focus only on buying from demand zones after a pullback. In a downtrend, focus only on selling from supply zones after a pullback. Remember, a bearish ChoCH must occur to confirm a trend shift. ✔
Drawing a valid Supply and Demand Zone.
Drawing a well-fitted zone is simple:
- To create a supply zone, identify the last bullish candle before a bearish swing.
- To create a demand zone, identify the last bearish candle before a bullish swing.
✅ Supply Zone:
- You look for the last bullish (up) candle before a strong bearish move (impulsive drop).
- This candle typically represents the final point of buying before institutions start heavy selling — marking a valid supply zone.
✅ Demand Zone:
- You look for the last bearish (down) candle before a strong bullish move (impulsive rally).
- This marks the final point of selling before strong buying comes in — forming a valid demand zone.
Closing Comment.
Always remember, the market isn’t going anywhere fast. Only look to buy from demand zones in an uptrend after a pullback (corrective move) into the demand zone, and sell from supply zones in a downtrend after a pullback (corrective move) into the supply zone.
🎯 Moral of the Story:
Trade with the trend, not against it. Let structure and zones guide my entries, not emotions. Patience, discipline, and clarity in direction always win.