
My Rules and Notes:
- After learning this scalping strategy, I came to an conclusion that we have to take trade entries with the continuation trend.
- This article is written and example based on a bullish trend continuation.
- Use this strategy at least 10 times successfully to believe in the setup.
Name of the strategy: 1-minute scalping strategy
Read more about this strategy at 1-minute scalping strategy and video at Youtube.
Time frames to use:
We will use only two time frames, 15min for (HTF) and 5min/1min for (LTF).
Market structure markup:
In 15min (HTF), Mark all the zones and liquidity swing low as below:
- Demand Zones and Liquidity Swing Low in a Bullish Market.
- Supply Zones and Liquidity Swing High in a Bearish Market.
Strategy to follow:
Step 1: –->

In 15min (HTF), we need to build our trade narrative using these three questions as below:
- Is price Bullish or Bearish?
- Is price in Continuation phase or the Pullback phase?
- Where is the available Liquidity?
Example/Answer:
- Price is Bullish.
- Price is in Pullback Phase.
- I have marked up the liquidity.
Step 2: –->
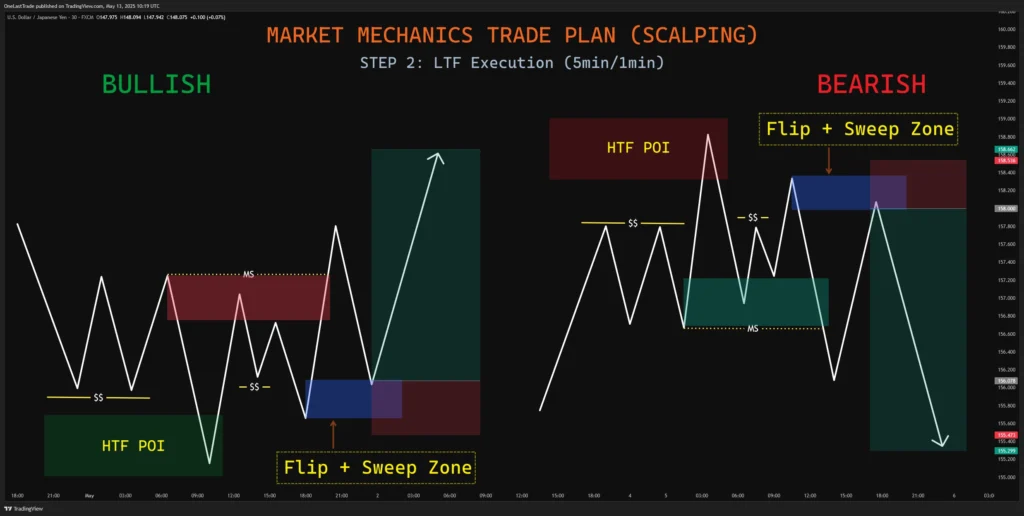
Wait for the price to enter into our demand zone. Shift down to 5min/1min (LTF) to start analyzing the price.
Important Note: I can use either 5min or 1min time frame. (Note: Don’t use 1min timeframe unless I am a experienced with this entry model.)
Look for the liquidity sweep with a sharp V-shape reaction for early participants. (Mark the supply zone which created V-shape reaction.)
Price reacts from supply zone but fails to break the (Lower Low: The V-shape swing low.)
Price again created a internal swing low where again early participants has entered. (Mark the new demand zone: This created a S2D Flip Zone.)
We want a S2D Flip Zone to fail (The new demand zone should fail.), so market again does a liquidity sweep for early participants who have entered from the new demand zone.
The last signal is that we want a market shift (MS) in 5min/1min (LTF) to align with 15min (HTF) trend. (The zone which creates the market shift (MS) is the Flip + Sweep zone, so mark the zone.)
Mark the Flip + Sweep zone, wait for the price pullback and take trade entry from here.
Pro Tip: Two-Times Liquidity Sweep, Failed Flip Zone and Market Shift. That’s it.
Both the scenario:
| Bullish Scenario | Bearish Scenario |
| 1. Liquidity Sweep: V-shape sharp reaction. 2. Failed S2D Flip Zone. 3. Liquidity Sweep of new demand zone participants. 4. Wait for Market Shift. 5. Enter from Flip + Sweep Zone. | 1. Liquidity Sweep: V-shape sharp reaction. 2. Failed D2S Flip Zone. 3. Liquidity Sweep of new supply zone participants. 4. Wait for Market Shift. 5. Enter from Flip + Sweep Zone. |
Trade Management Rules:
Enter from 5min/1min (LTF) demand zone. Set entry limit order on the edge, stop-loss behind the (5min/1min demand zone) only or entry manually if missed and use the confirmation entry method on 5min/1min (LTF) chart.
- Target the nearest 15mins supply zone for realistic results.
- Minimum risk-to-reward is 1:3 RR, but I use 1:5 RR.
- Set & Forget (No partials or trailing stops).
// 1-Minute Scalping Strategy Finished. //
Extra bonus tips
I have to practice the observation of price at the zones, count how many times price is sweeping liquidity, how price reversal patterns are repeating at the zone.
To do so, I have to take multiple screenshots, print it on a paper and analyze it to improve my accuracy. (So, minimum three sets of price action patterns I need to practice and learn.)
Lastly, I may modify this article if I see any improvements that’s needs to be done.